Getting Started with Windows Live Mail on Windows 7
Previously we showed you the basics of Windows Live Essentials 2011 and the programs it includes. Today we’ll take a closer look at getting started with Windows Live Mail on Windows 7.
Install & Setup Your Live Mail
If you haven’t done so already, download and install the Live Mail from the Windows Live Essentials 2011 Suite.
![sshot-2010-11-18-[16-29-54] sshot-2010-11-18-[16-29-54]](http://theaverageguy.tv/wp-content/uploads/2010/11/sshot-2010-11-18-16-29-541.png)
After it’s installed you’ll find Live Mail in the Start Menu, just click to launch it.
![sshot-2010-11-20-[22-36-58] sshot-2010-11-20-[22-36-58]](http://theaverageguy.tv/wp-content/uploads/2010/11/sshot-2010-11-20-22-36-58.png)
Setup Live Mail with Live or Hotmail Account
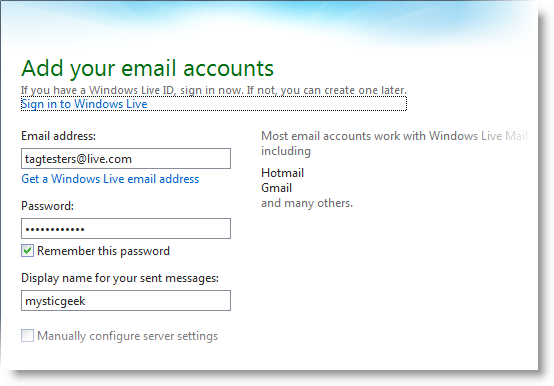
Here we’ll setup a Live account, but you can also setup Gmail and many others. We’ll be taking a look at setting up other accounts in the future where you might need to manually configure the settings. The first time you launch Windows Live Mail you’ll be prompted to setup your email address then click Next.

You’ll get a dialog asking if you want to sign in as the email you entered…if you have multiple accounts you might not want to. For this tutorial we’ll go ahead and select Yes.
![sshot-2010-11-22-[05-00-20] sshot-2010-11-22-[05-00-20]](http://theaverageguy.tv/wp-content/uploads/2010/11/sshot-2010-11-22-05-00-20.png)
Success! Your email account is setup…nice and simple without having to worry about configuring settings manually.
![sshot-2010-11-22-[04-56-28] sshot-2010-11-22-[04-56-28]](http://theaverageguy.tv/wp-content/uploads/2010/11/sshot-2010-11-22-04-56-28.png)
The user interface has come a long way since the days of Outlook Express. If you’re new to Live Mail, there will be a bit of a learning curve, but once you get started you’ll be a pro in no time.
![sshot-2010-11-22-[04-59-33] sshot-2010-11-22-[04-59-33]](http://theaverageguy.tv/wp-content/uploads/2010/11/sshot-2010-11-22-04-59-33.png)
You can change the view of how the mail is displayed like you could in previous versions. To get the layout above click the View tab on the Ribbon >> Reading Pane >> Bottom of the message list. There are of course other view settings you can configure, just pick what works best for you.
![sshot-2010-11-22-[04-58-13] sshot-2010-11-22-[04-58-13]](http://theaverageguy.tv/wp-content/uploads/2010/11/sshot-2010-11-22-04-58-13.png)
Using Windows Live Mail
Let’s take a look at some of the features and how to actually use Live Mail for basic tasks. To send a new message…make sure you have the Home tab selected and click Email Message. Or you can select the New Email icon from the Quick Access Toolbar.
![sshot-2010-11-22-[05-07-49] sshot-2010-11-22-[05-07-49]](http://theaverageguy.tv/wp-content/uploads/2010/11/sshot-2010-11-22-05-07-49.png)
The Quick Access Toolbar gives you faster access to different tools and features. Notice in the image above mine is underneath the Ribbon. I find this an easier location to access the icons and to put it under the Ribbon. Click the down arrow and select Show below the Ribbon. Like in this example…when starting a new message the Quick Access Toolbar is above the Ribbon by default.
![sshot-2010-11-22-[05-14-48] sshot-2010-11-22-[05-14-48]](http://theaverageguy.tv/wp-content/uploads/2010/11/sshot-2010-11-22-05-14-48.png)
Then enter in the recipient’s email, Subject, and compose the message.
![sshot-2010-11-22-[05-19-45] sshot-2010-11-22-[05-19-45]](http://theaverageguy.tv/wp-content/uploads/2010/11/sshot-2010-11-22-05-19-45.png)
If you want to Carbon Copy or Blind Carbon Copy someone in the mail you can toggle between showing the BCC and CC fields.
![sshot-2010-11-22-[05-20-55] sshot-2010-11-22-[05-20-55]](http://theaverageguy.tv/wp-content/uploads/2010/11/sshot-2010-11-22-05-20-55.png)
If you need to attach a file click the Insert tab the Attach File. Notice you can also insert a Business Card, Photo Albums, Hyperlinks and Emoticons as well.
![sshot-2010-11-22-[05-26-30] sshot-2010-11-22-[05-26-30]](http://theaverageguy.tv/wp-content/uploads/2010/11/sshot-2010-11-22-05-26-30.png)
Just like in Outlook there’s a handy Calendar feature, although not as feature filled, but good enough for most home users.
![sshot-2010-11-22-[22-47-43] sshot-2010-11-22-[22-47-43]](http://theaverageguy.tv/wp-content/uploads/2010/11/sshot-2010-11-22-22-47-43.png)
Just double click on a date you need to schedule something for and another window comes up where you can manage the event.
![sshot-2010-11-22-[22-48-12] sshot-2010-11-22-[22-48-12]](http://theaverageguy.tv/wp-content/uploads/2010/11/sshot-2010-11-22-22-48-12.png)
It also functions as an RSS reader for those of you who can’t get enough information from your favorite sites.
![sshot-2010-11-22-[22-49-34] sshot-2010-11-22-[22-49-34]](http://theaverageguy.tv/wp-content/uploads/2010/11/sshot-2010-11-22-22-49-34.png)
Hopefully this will get you started using Windows Live Mail. There are a lot of other features that we haven’t covered yet, but once you start using it, it becomes very intuitive. If you’re looking for an email client and don’t need everything Outlook has to offer, Windows Live Mail is a great choice for the home user.


Actually, my favorite Live Mail feature is the new text animations … new messages slide in at the top with Metro/Windows Phone 7 style animations. Nothing highly distracting, but just enough to keep your desktop feeling alive and vibrant in the age of iOS 🙂